Email spoofing is the forgery of an email sender address so that the message appears to come from someone other thanthe actual source – i.e., is instead a forged address. Spammers will often spoof emails in order to encourage recipients to open, reply to, or even take action in response to their solicitations.
Email spoofing is one of the most common forms of cybercriminal activity, specifically a form of identity deception that's widely used in phishing and spam attacks. It underpins the mechanism required to conduct hacking activities, and it can take many forms. Unfortunately, most email users will eventually receive an email that has been spoofed—whether they know it or not.
This ubiquitous identity deception technique is what threat actors and/or crime rings use to bamboozle people into revealing sensitive information—including their login credentials or financial information. Some of the most prevalent forms of email spoofing are:
- Business email compromise, such as display name deception
- Legitimate domain or lookalike domain spoofing
- Spear phishing, including social engineering, like a lure that tries to get the recipient to download documents on a fake site or unknowingly provide their credentials to a common site or provider
And while brand spoofing is common, we are increasingly seeing criminal activities where individuals are being spoofed and targeting employees, partners, and/or customers – called executive impersonation. For example, fraudsters might send your employees emails that appear to come from your CEO, or they might send your customers emails that appear to come from you or your marketing department.

What's in place to protect against email spoofing?
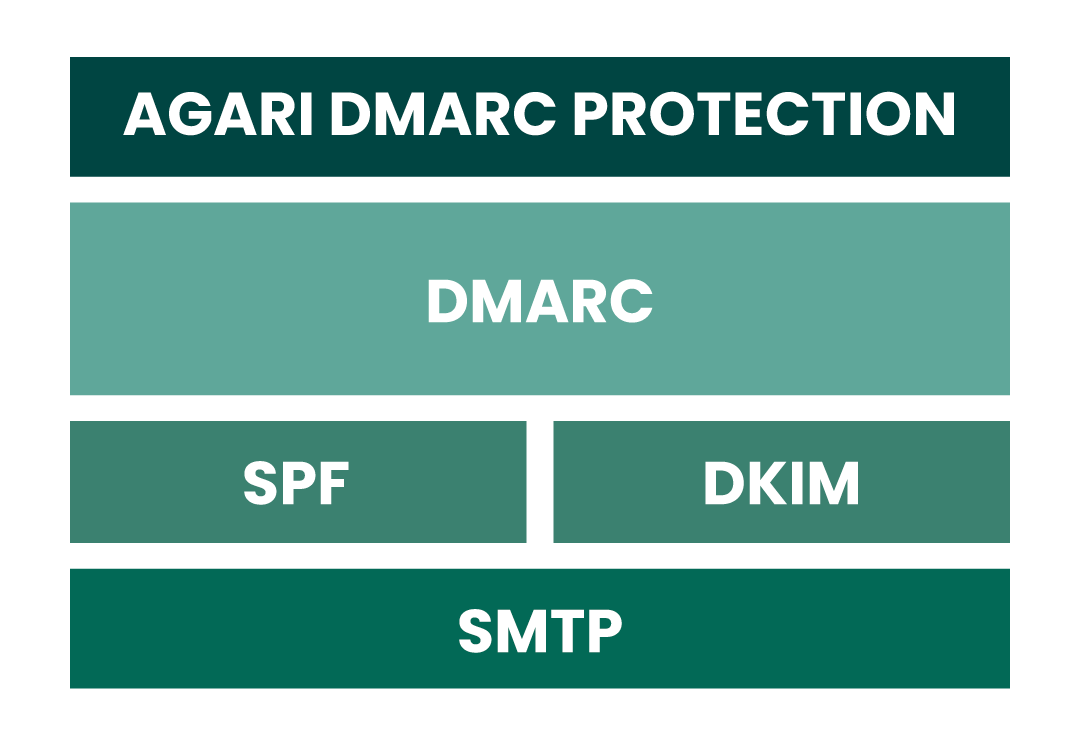
Luckily, there are multiple email authentication protocols that can help protect your organization from being spoofed – all of which help improve email deliverability, and when combined, play critical parts in preventing email spoofing.
First, Delineate DKIM
DomainKeys Identified Mail (DKIM) is an email protocol that leverages cryptography to ensure the emails you send are not modified in transit so they can be manipulated and spoofed. You’ll first want to check your DKIM record through a free online one like ours located here. Then proceed along the path to a correct DKIM setup:
- List all domains and subdomains from which you send email messages. If you use any third-party platforms to send emails, make sure you include those too. For example, check if you’re sending emails from platforms like these:
- Email Marketing (e.g., Mailchimp)
- Marketing Automation (e.g., Marketo)
- Customer Relationship Management (e.g., Salesforce)
- Customer Service Email Management (e.g., Outpost)
- Any other 3rd parties or vendors that send email on your behalf
- You’ll need to install a DKIM package, like OpenDKIM, on your email server. Your choice of DKIM package will depend on the email server’s operating system. The installation process will depend on the DKIM package and operating system.
- Use a DKIM key wizard (which can be found online for free) to generate a public and private key pair. You can find many like this one by simply Googling “DKIM wizard.” You’ll have to specify selector names for your key pairs. Selectors tell receiving email servers where to find the public key for each domain. It’s best to make selectors descriptive of what their domain sends. For example, the selector for your email marketing domain could be “marketing.”
- Your DKIM wizard should return a selector record that should look like this: (selector)._domainkey (You’ll need to add a TXT record with that name to your DNS, so you need access or someone who has it.*) The value of the record is a specially formatted version of your DKIM key and some identifying information that tells receivers how to interpret it. The complete record will look something like this (this is Agari’s record): s1024._domainkey.Agari.com. v=DKIM1; k=rsa; p=MIGfMA0GCSqGSIb3DQEBAQUAA4GNADCBiQKBgQDQwPqBxkIOc1YVnJv3Occfbd3S68
*Note that changes to your DNS can take as many as two days to take effect.
- Your DKIM wizard should also produce your private key, which should be stored wherever your DKIM package specifies.
- Your particular server or email service provider may have additional instructions for installing DKIM. If you’re using an email service provider or hosting provider, work with them for any necessary server configuration.
- Unfortunately, setup can sometimes be tricky and common mistakes include:
- Multiple records named selector ._domainkey: This can result in email servers rejecting your DKIM records as invalid; make sure you have only one DKIM record in your DNS.
- You've entered an incorrect DKIM record name: Some DNS hosts automatically add your domain at the end of a selector._domainkey TXT record; if you entered it manually, check to make sure it didn't add an additional ".domain" to your record.
- You have a missing or misconfigured private or public key: Both are required to be present; sometimes fixing this is as easy as regenerating the public and private key pair.
Second, Set Up SPF
Sender Policy Framework (SPF) is a form of email authentication used to prevent spoofing that ensures emails being sent with your domain only originate from specific IP addresses. If you have access to the DNS server your mail server uses, you can look for a TXT record that begins with “v=spf”. However, an easier way to check any domain is to use the SPF Lookup Tool where you can verify the existence of SPF records and their settings.
If you don’t have an SPF email record set up, you can easily create one. However, there are some steps to take before creating your SPF email record. In order to make changes, you’ll want to know some key information, such as the hostname and/or IP address of your mail server, a list of other servers you want your email to be sent from, and of course the location and login information to your DNS server.
- Login to your DNS server. This may be through a web portal if your DNS is hosted for you by a third party.
- Create a new TXT record. Some DNS servers have an option to add an SPF type record, but you should still always use a TXT type record. When choosing a record name you can put “@” or leave it blank.
- Input your SPF email rule in the section marked text or value. Make sure it begins with the version syntax and ends with an “all” qualifier.
- Note that after publishing your SPF email record, it may take up to 48 hours to take effect.
Depending on your goals, a simple SPF email record with one server might not be enough. For example, SPF does not automatically encompass subdomains. You’ll need to include each subdomain in your record. In addition, some systems have a 255-character limit for your SPF email record. If you're approaching the limit, you can do the following to shorten your record:
- Remove any pointer (ptr) mechanisms: These are deprecated & count against your lookup limit/word count.
- Check your sending address range: If you have many different IP addresses those can often be abbreviated by specifying the whole subnet, rather than individual servers.
- Clean up/delete old vendors: Over time you may stop using specific email services, check your records to verify that you are still using that server to send from.
- Use Agari-hosted SPF: Agari’s hosted records have a shorter character length, but can effectively include more service providers within those characters.
Third, Deliver on Delivery with DMARC
The Domain-based Message Authentication, Reporting, and Conformance (DMARC) protocol stops spoofing by ensuring inbound mail has SPF and/or DKIM present within the email headers. So what does this really mean? You should have SPF and DKIM deployed and authenticating messages for at least 48 hours before setting up DMARC. Then, you can follow these DMARC setup steps to add it to your DNS:
Step 1: Use our DMARC Setup Tool to easily create the required TXT record. It should look something like this example: V=DMARC1; p=none; rua=mailto:dmarc-feedback@ (This example record instructs receiver systems to generate and send aggregate feedback to "dmarc-feedback@" your domain. The p=none tag indicates you are only interested in collecting feedback.) Alternatively, you could use a p=quarantine, or p=reject tags for emails that fail authentication.
Step 2: In your DNS, create a DNS TXT record by logging into the management console of your DNS hosting provider and locating the page that allows you to add a DNS TXT record (please note that this may vary by provider).
Step 3: In the Type box, select TXT Record Type.
Step 4: In the Host Value box, enter “_dmarc” as the host.
Step 5: In the TXT Value box, enter the record you created using DMARC Record Creator.
Step 6: Save the DMARC record.
Step 7: Validate the DMARC setup.
DMARC contains the three key elements of feedback, policy, and identity alignment when it’s successfully added to the already deployed, fundamental SPF and DKIM frameworks. This accomplishes the following:
- DMARC allows email senders to publish policies telling receivers when they should rely on DKIM and SPF for a given domain, and what to do when messages fail those tests. Its most aggressive enforcement policy is set to reject (p=reject), which means email messages that don't pass DMARC authentication will be rejected by a mail server and, in turn not delivered to their intended recipient. This stringent policy ensures that fraudsters are unable to hijack your domains for use in email attacks targeting your customers, partners, and the public, and thus will block spoofed messages outright.
- DMARC also allows senders to tell receivers where to send feedback regarding their messages, so the senders can understand what is or isn’t being delivered, and why.
- Finally, DMARC adds the requirement that the “From:” email address which a recipient sees matches the email domains that SPF and DKIM have authenticated.

Conclusion
By implementing and enforcing all three of these authentication protocols in tandem, DMARC makes it possible for email receiving systems to make firm decisions about which emails to reject and which to deliver, so organizations can be confident that they are properly carrying out the policies set by the authorized sender of those emails. Then organizations can rest assured that their business communications (both in AND out) will flow freely and securely and that their customers will consider them a trustworthy partner. Because, at the end of the day, “failure to deliver” email is really “failure to deliver” what you promised to your customer – which in the end IS security.

