In this DKIM setup guide, we’ll walk you through the steps on how to set up DKIM correctly, test it, avoid common pitfalls, and fix common mistakes. In case you’re new to DKIM, or DomainKeys Identified Mail, we’ll start with a high-level overview before getting to the step-by-step instructions, but you can first look up your DKIM record here.
How to Set Up DKIM Step by Step
You’ll need a few things to start DKIM setup:
- A list of all your domains that send emails
- A DKIM package for your email server
- A DKIM key wizard (which are readily found online for free)
- Access to your DNS (or someone who does)
- A DKIM record checker (which are also readily found online for free)
Then you can proceed along the path to a correct DKIM setup:
1) List all of your sending domains
List all domains and subdomains from which you send email messages. If you use any third-party platforms to send emails, make sure you include those too. For example, check if you’re sending emails from platforms like these:
- Email Marketing (e.g. Mailchimp)
- Marketing Automation (e.g. Marketo)
- Customer Relationship Management (e.g. Salesforce)
- Customer Service Email Management (e.g. Outpost)
- Anything else that sends email on your behalf
2) Install a DKIM package
You’ll need to install a DKIM package, like OpenDKIM, on your email server. Your choice of DKIM package will depend on the email server’s operating system. The installation process will depend on the DKIM package and operating system.
3) Create the public & private DKIM key pair
Use a DKIM key wizard to generate a public and private key pair. You can find many like this one by simply Googling “DKIM wizard.”
You’ll have to specify selector names for your key pairs. Selectors tell receiving email servers where to find the public key for each domain. It’s best to make selectors descriptive of what their domain sends. For example, the selector for your email marketing domain could be “marketing.”
4) Publish your public DKIM key
Your DKIM wizard should return a selector record that should look something like this: (selector)._domainkey
You’ll need to add a TXT record with that name to your DNS.* The value of the record is a specially formatted version of your DKIM key and some identifying information that tells receivers how to interpret your DKIM key. The complete record will look something like this, which is the DKIM record for Agari.com:
s1024._domainkey.Agari.com. v=DKIM1; k=rsa; p=MIGfMA0GCSqGSIb3DQEBAQUAA4GNADCBiQKBgQDQwPqBxkIOc1YVnJv3Occfbd3S68
*Note that changes to your DNS can take as many as two days to take effect.
5) Hide your private DKIM key
Your DKIM wizard should also produce your private key, which should be stored wherever your DKIM package specifies.
6) Configure your email server
Your particular server or email service provider may have additional instructions for installing DKIM. If you’re using an email service provider or hosting provider, work with them for any necessary server configuration.
7) Common mistakes during setup
Unfortunately, setup can sometimes be tricky and common mistakes include:
- Multiple records named selector ._domainkey: This can result in email servers rejecting your DKIM records as invalid; make sure you have only one DKIM record in your DNS
- You've entered an incorrect DKIM record name: Some DNS hosts automatically add your domain at the end of a selector._domainkey TXT record; if you entered it manually, check to make sure it didn't add an additional ".domain" to your record
- You have a missing or misconfigured private or public key: Both are required to be present; sometimes fixing this is as easy as regenerating the public and private key pair
Prevent Email Spoofing Attacks
DKIM helps improve email deliverability and when combined with SPF (Sender Policy Framework) and DMARC (Domain-based Message Authentication, Reporting, and Conformance), it can play a critical role in preventing email spoofing.

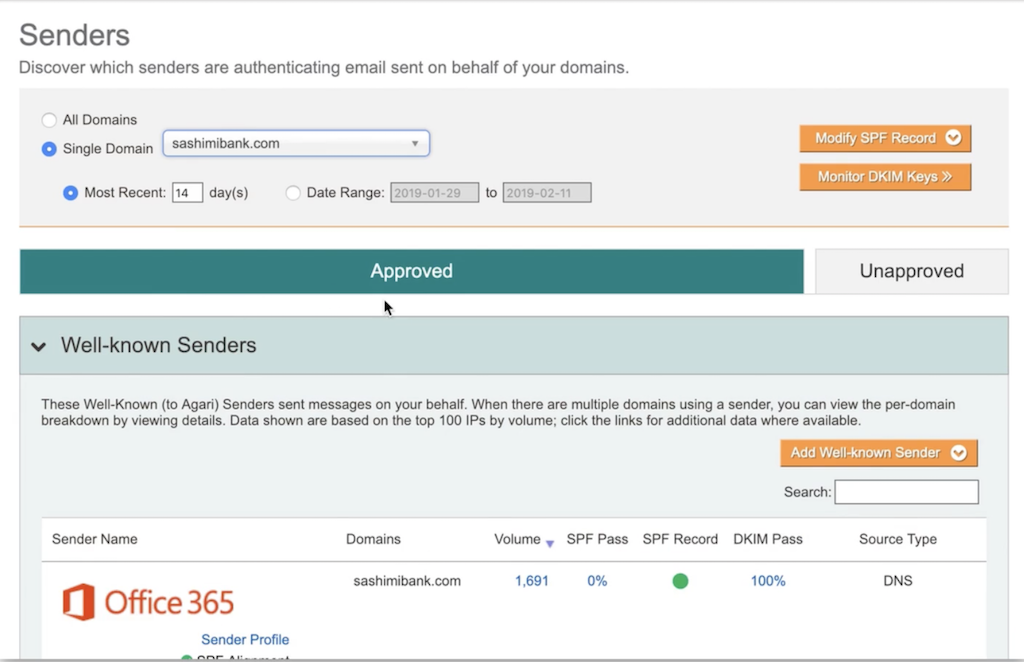
Example of DKIM passing rate for Office 365 as third-party sending domain for "dummy" financial institution in backend of Agari DMARC Protection platform.
Email spoofing occurs when a fraudster sends an email that looks as though it was sent from someone else by using a forged sender address. For example, fraudsters might send your employees emails that appear to come from your CEO, or they might send your customers emails that appear to come from you.
This is one of the identity deception techniques email crime rings use to bamboozle people into revealing sensitive information—including their login credentials or financial information. Email spoofing is used in phishing and business email compromise (BEC) scams.
How Do I Further Help Prevent Spoofing?
You achieve this by adding SPF, DMARC and BIMI, in addition to DKIM! Here's an explanation of each protocol below:
Sender Policy Framework (SPF)
SPF is an email authentication standard that allows domain owners to specify which servers are authorized to send email with their domain in the “Make From:” email address. SPF allows receiving email systems to query DNS to retrieve the list of authorized servers for a given domain. If an email message arrives via an authorized server, the receiver can consider the email legitimate.
Domain-based Message Authentication, Reporting & Conformance (DMARC)
DMARC is an email authentication standard that works as a policy layer for SPF and DKIM to help email receiving systems recognize when an email isn’t coming from a company’s approved domains, and provides instructions to email receiving systems with email on how to safely dispose of unauthorized email.
Brand Indicators for Message Identification (BIMI)
BIMI is an email specification that works in conjunction with DMARC to enable companies to have their logos displayed next to their email messages in a recipient’s email client. Not only does this enhance brand visibility in crowded inboxes, it also verifies that the email is legitimate and comes from a trusted source.
Discover how Agari DMARC Protection automates and simplifies email authentication so you can get to a reject policy faster!
A Lofty Enterprise Deployment for DomainKeys and More?
Adding DKIM, SPF, DMARC or BIMI to a single domain is relatively easy and takes just a few moments. But applying them across all the domains in an organization's entire email ecosystem can get complicated and costly—fast. This is especially true when you’re talking about thousands of domains across numerous divisions and third-party email partners at a large enterprise, so they need to leverage a more comprehensive and automated solution, such as Agari DMARC Protection.
Take a Product Tour
Want to know how to further simplify DKIM (and DMARC and SPF, while you're at it)? Watch a simulated demo of Agari DMARC Protection!
