Data science applications provide much of the power behind Agari’s e-mail security products. The e-mail landscape is vast and dynamic, and we require the ability to regularly analyze incoming data. Models including forwarder classification, malicious campaign identification, domain reputation, and inbound sender modeling are created on hourly to daily cadences. We therefore need a fast and cost-efficient way of analyzing our data as it arrives. Stand-alone Spark clusters, while having the advantage of constant availability, become expensive when idling for a large portion of time. This blog post covers, in detail, the specific tools that we use to create a scheduled and automated model building job which meets our requirements.
We utilize Amazon Web Services (AWS) in addition to an array of open source technologies to build our models. Here is a summary of the concepts covered in this post, with more detailed information given as we cover the details of our usage with each:
- AWS Elastic Map Reduce (EMR) – A web service which provides a managed Hadoop framework is useful for computing large data sets.
- Spark – A distributed computing platform which allows applications to be written in Scala, Python, and R.
- Airflow – A workflow management program which allows for scheduling and monitoring of jobs.
- Ansible – A script-based automation platform similar to Puppet and Chef.
- Jinja – A template engine for Python.
- AWS S3 – A scalable, remote data store.
- AWS Command Line Interface (CLI) – used to manage AWS services.
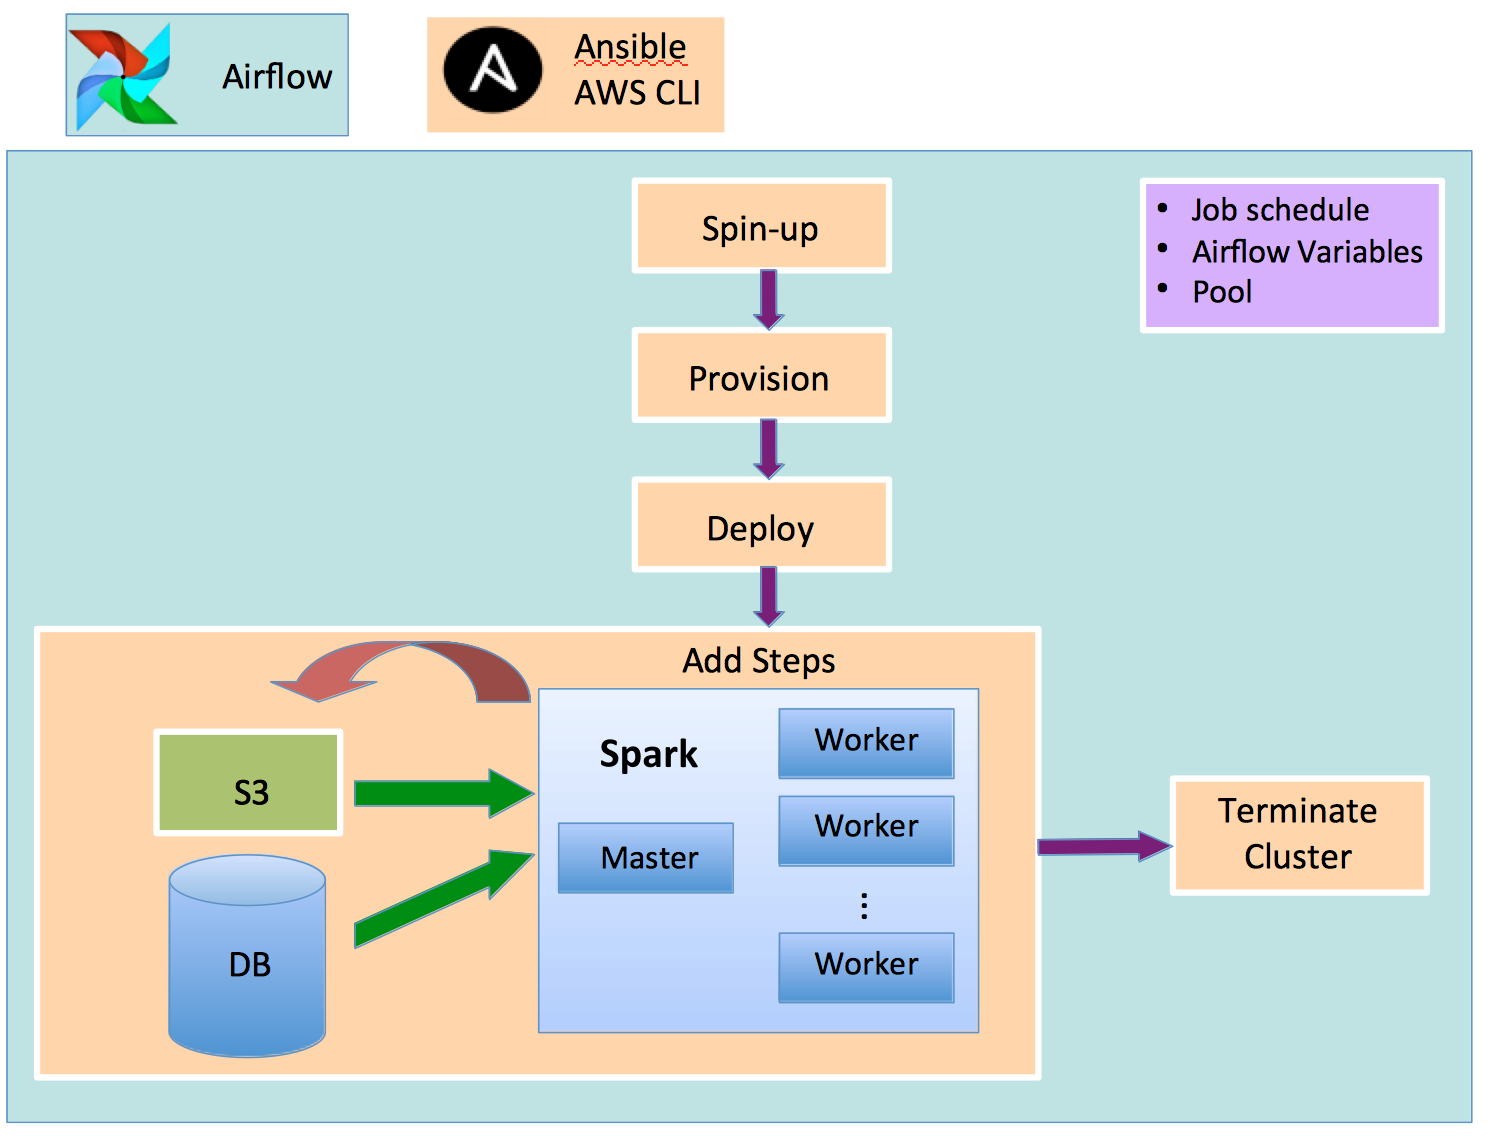
Models are built using Spark, written in Python, and run within an EMR cluster which is spun up using the AWS CLI. Each member of the cluster is provisioned with the necessary dependencies and code via Ansible, along with the credentials necessary to pull data from S3 and an external database. Steps are added via the CLI for each step in the model building process, and progress is paused until a CLI query returns a signal that the step has completed. The model outputs are written to S3. When all steps have completed successfully, a termination signal is sent to the cluster to spin down the node instances. This entire process is orchestrated as a job in Airflow as shown in Figure 1, with orange boxes representing scheduled tasks, and the arrows representing dependencies on previous tasks.

Figure 1: Flow diagram of an automated model building DAG
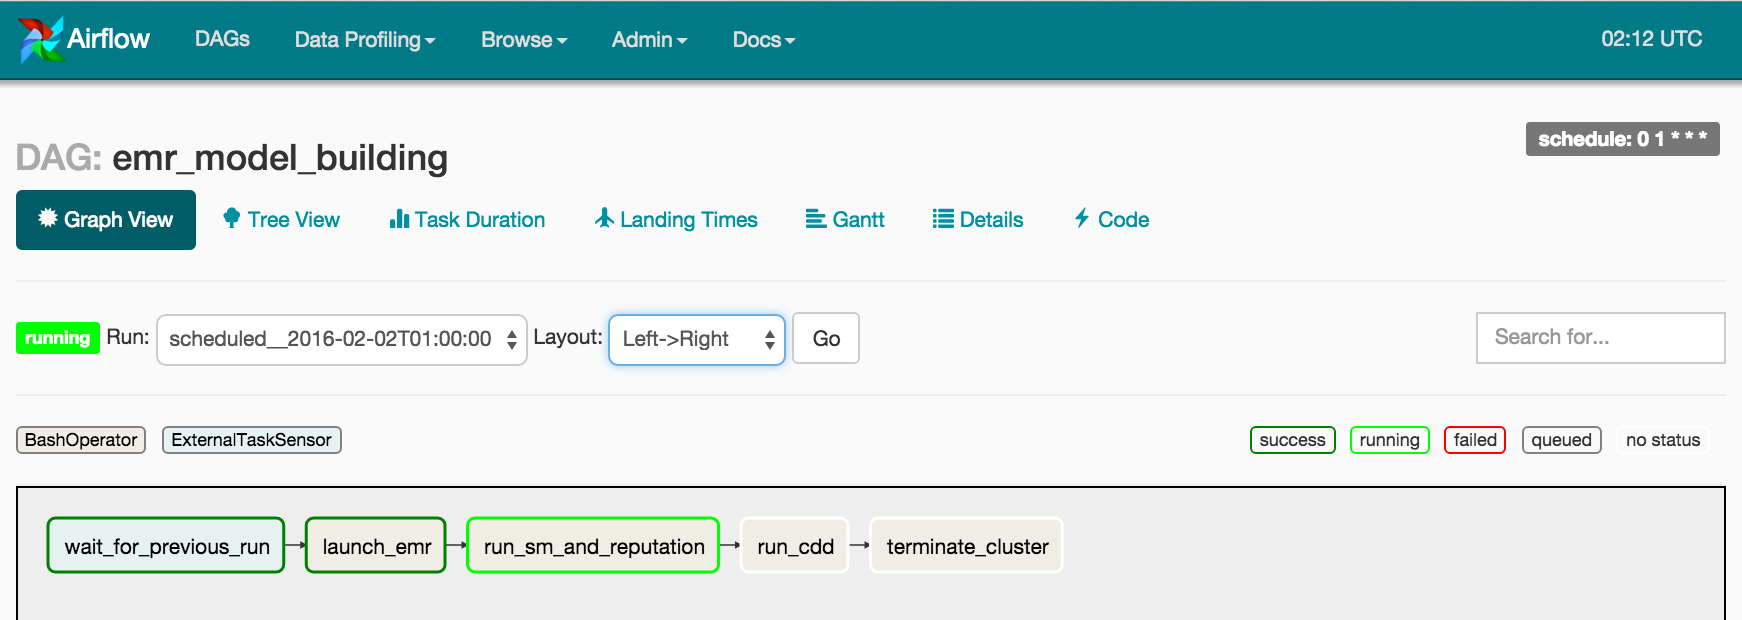
Airflow is a fantastic platform for managing workflows. Users author these workflows by constructing directed acyclic graphs (DAGs) composed of individual task nodes. You can schedule, monitor, alert upon, and investigate run times for your jobs and individual tasks. Figure 2 shows the graph view of the workflow of Figure 1. The spin-up, provision, and deploy tasks are included in launch_emr. These tasks are responsible for instantiating the cluster, for loading third party packages (e.g. NumPy, scikit-learn), and for deploying our Spark jobs onto each node, respectively. The next two tasks – run_sm_and_reputation and run_cdd – add steps to the EMR cluster. Steps in EMR are defined as units of work which can contain one or more Hadoop jobs. Steps are added via the AWS CLI to a cluster’s queue in a first-in-first-out fashion.

Figure 2: Graph view in Airflow of the model building DAG
Arrows in Figure 2 denote dependencies between the tasks. The launch_emr task here is downstream of the wait_for_previous_run task and upstream of the rest. There are several built-in visualization tools that may be used to gain insight into the run time of your DAGs. Shown in Figure 3 is the Gantt chart of an EMR model building run. This view is useful for visualizing a breakdown of the run-time for each task. Also useful is the Task Duration view, which shows the run-times of the DAG and each task as a function of time. Here we can see that the slowest part of the model building is run_sm_and_reputation. This task includes two separate model builds which are run at the same time. We do this because both model builds are built from the same data. Since it’s more efficient to load this data only once, the Spark jobs kicked off by this task loads the data, then builds each model sequentially.

Figure 3: Gantt chart showing runtime of each task in the DAG
Another useful feature in Airflow is the ability to clear tasks and DAG runs or to mark them as successful. These actions may be taken for a single task, as well as in the upstream, downstream, past, and future directions to the task. This allows you to re-run and skip tasks from the UI.
The Python code used to generate this DAG is shown here:
import logging
import datetime
from datetime import datetime, timedelta
from airflow import DAG
from airflow.operators import BashOperator, ExternalTaskSensor
from telemetry_pipeline_utils import *
START = datetime.combine(datetime.today() - timedelta(days=2), datetime.min.time()) + timedelta(hours=10)
DAG_NAME = 'emr_model_building'
# initialize the DAG
default_args = {
'pool': 'emr_model_building',
'depends_on_past':False,
'start_date': START,
'retries': 1,
'retry_delay': timedelta(seconds=120),
'email_on_failure': True,
'email_on_retry': True
}
dag = DAG(DAG_NAME, default_args=default_args, schedule_interval='0 1 * * *')
# define the bash commands used in the tasks
launch_emr = """
{% if params.ENV == "PROD" %}
echo "Launching EMR cluster in Prod Env"
source ~/.bash_profile; /home/deploy/automation/roles/cluster/cluster.sh launch,provision,deploy model_building_prod.conf
{% else %}
echo "Launching EMR cluster in Stage Env"
source ~/.bash_profile; /home/deploy/automation/roles/cluster/cluster.sh launch,provision,deploy model_building_stage.conf
{% endif %}
"""
run_sm_and_reputation = """
{% if params.ENV == "PROD" %}
echo "Building sender models in Prod Env"
source ~/.bash_profile; /home/deploy/automation/roles/cluster/cluster.sh sd model_building_prod.conf
{% else %}
echo "Building sender models in Stage Env"
source ~/.bash_profile; /home/deploy/automation/roles/cluster/cluster.sh sd model_building_stage.conf
{% endif %}
"""
run_cdd = """
{% if params.ENV == "PROD" %}
echo "Building CDD in Prod Env"
source ~/.bash_profile; /home/deploy/automation/roles/cluster/cluster.sh cdd model_building_prod.conf
{% else %}
echo "Building CDD in Stage Env"
source ~/.bash_profile; /home/deploy/automation/roles/cluster/cluster.sh cdd model_building_stage.conf
{% endif %}
"""
terminate_cluster = """
{% if params.import_terminate_emr_cluster == true %}
{% if params.ENV == "PROD" %}
echo "Terminating EMR cluster in Prod Env"
source ~/.bash_profile; /home/deploy/automation/roles/cluster/cluster.sh terminate model_building_prod.conf
{% else %}
echo "Terminating EMR cluster in Stage Env"
source ~/.bash_profile; /home/deploy/automation/roles/cluster/cluster.sh terminate model_building_stage.conf
{% endif %}
{% else %}
echo "NOT terminating EMR cluster"
{% endif %}
"""
# define the individual tasks using Operators
t0 = ExternalTaskSensor(
task_id='wait_for_previous_run',
trigger_rule='one_success',
external_dag_id=DAG_NAME,
external_task_id='terminate_cluster',
allowed_states=['success'],
execution_delta=timedelta(days=1),
dag=dag)
t1 = BashOperator(
task_id='launch_emr',
bash_command=launch_emr,
execution_timeout=timedelta(hours=6),
pool='emr_model_building',
params={'ENV': ENV, 'import_terminate_emr_cluster':import_terminate_emr_cluster},
dag=dag)
t2 = BashOperator(
task_id='run_sm_and_reputation',
bash_command=run_sm_and_reputation,
execution_timeout=timedelta(hours=3),
pool='emr_model_building',
params={'ENV': ENV},
dag=dag)
t3 = BashOperator(
task_id='run_cdd',
bash_command=run_cdd,
execution_timeout=timedelta(hours=3),
pool='emr_model_building',
params={'ENV': ENV},
dag=dag)
t4 = BashOperator(
task_id='terminate_cluster',
bash_command=terminate_cluster,
execution_timeout=timedelta(hours=1),
params={'ENV': ENV, 'import_terminate_emr_cluster':import_terminate_emr_cluster},
pool='emr_model_building',
dag=dag)
# construct the DAG
t1.set_upstream(t0)
t2.set_upstream(t1)
t3.set_upstream(t2)
t4.set_upstream(t3)
Construction of the DAG consists of creating the individual tasks which leverage a variety of existing operators. Here, the ExternalTaskSensor and BashOperators are used, with dependencies between them defined via the set_upstream() method. The BashOperator is a mechanism which allows you to run bash commands and display the output. ExternalTaskSensor is useful for getting information on the state of other task runs – in this case, we use it to check if the previous run has completed. More complex workflow patterns are also available, including branch conditions and parallel task runs, but this DAG suffices for this application.
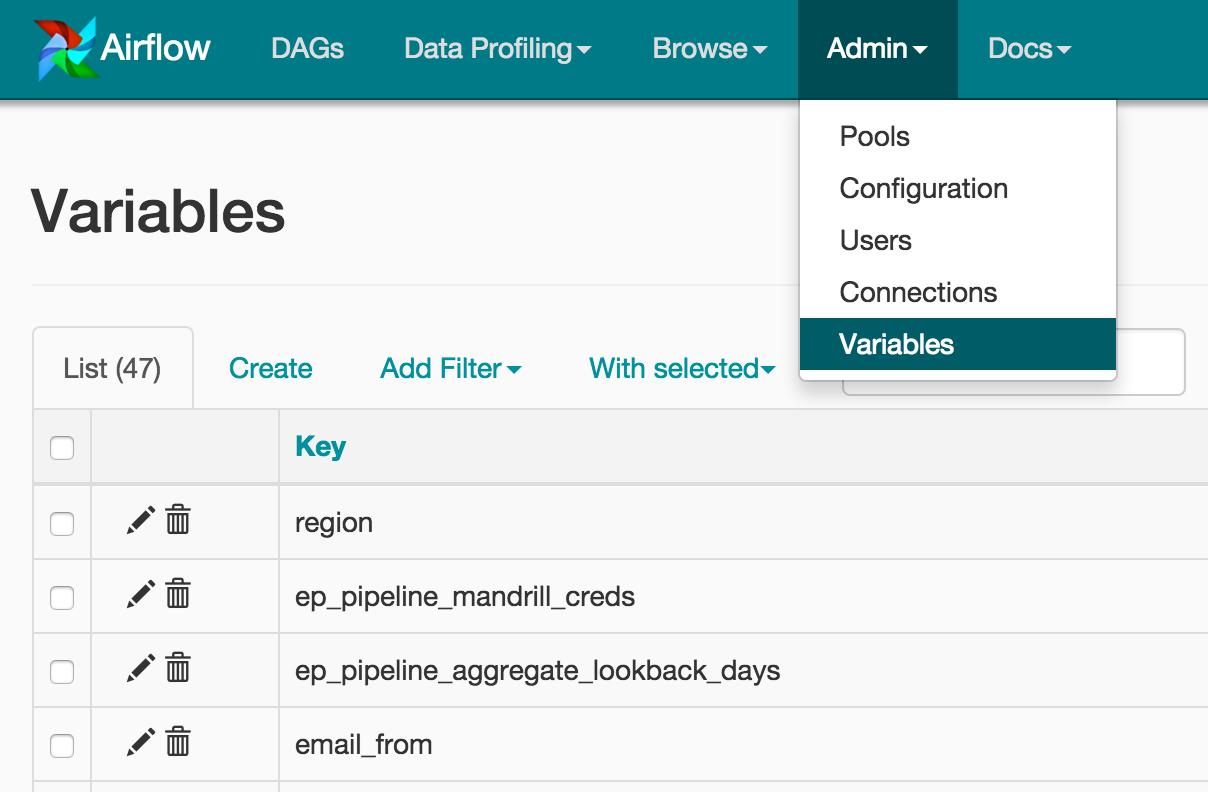
The tasks responsible for spinning up, adding steps to, and terminating the cluster consist of bash commands that we added to a shell script named cluster.sh. The DAG has both DAG-level (default) and task-level arguments. Jinja templating used within the BashOperator allows us to modify bash execution based on runtime Variables set within the Airflow UI. Variables in Airflow are key-value pairs which are accessible in the code created for a DAG. In this example, we can tell the EMR cluster to terminate upon completion by flipping a switch in the UI. This also allows for easier deployment to different environments. Figure 4 displays a few of the variables we set in Airflow.

Figure 4: Variables set within Airflow
The shell script cluster.sh contains the AWS CLI commands and Ansible playbook runs necessary for each of the steps above. Here we show a few snippets from the script which highlight the main parts of these operations. The command used to launch the EMR cluster is:
aws --profile $PROFILENAME
--region $AWS_REGION
emr create-cluster
--name "$NAME"
--release-label $RELEASELABEL
--applications $APPLICATIONS
--enable-debugging –log-uri=s3://agari-$ENVIRON-ep-metadata
--ec2-attributes KeyName=$KEYPAIR,
SubnetId=$SUBNETID
--tags $TAGS –use-default-roles
--instance-groups Name=Master,
InstanceGroupType=MASTER,
InstanceType=m3.xlarge,
InstanceCount=1 Name=Core,
InstanceGroupType=CORE,
InstanceType=$INST_TYPE,
InstanceCount=$NUMCORENODES
The variables here are defined in config files, the presence of which are hinted at in the bash command string templates of the Airflow DAG. Among other options, we set the logging to write to a pre-existing S3 bucket by defing an S3 URI. If you save the return string of the above command, it’s possible to parse out the cluster ID, which is useful when querying AWS for the status of the cluster to determine when it is finished initializing. The driver script waits until the cluster is completely spun up before proceeding. Here is the while loop which implements this logic:
echo "Waiting for completion of analysis ..." | $LOGIT
while true; do
resp="`/usr/local/bin/aws --profile $PROFILENAME --region $AWS_REGION emr describe-cluster --cluster-id $id`"
echo "Starting..."
if [ "`echo \$resp\" | grep 'WAITING'`"" ]; then
echo ""Cluster is up. Continuing.""
break
fi
sleep $POLLSECONDS
done
echo ""Processing & analysis has completed."" | $LOGIT
Following this step
The secure email gateway worked for years, but it is no match for a new generation of rapidly evolving advanced email attacks that use identity deception to trick recipients.
Download the guide to learn about the next-generation Secure Email Cloud Architecture, including:
- What cybercriminals are doing to successfully scam people and organizations
- How Office 365 and other cloud-based email have the same functionality as a SEG
- Why Agari and Office 365 are all you need to protect your organization from threats